
Digital advertising continues to evolve rapidly.
Publishers constantly search for better ways to increase revenue without harming user experience.
One powerful solution is Rewarded Ads.
Rewarded ads allow users to choose to watch an ad voluntarily.
In return, users receive some benefit.
This benefit may include access to premium content, downloads, tools, or exclusive features.
Because users willingly watch the ad, engagement becomes extremely high.
As a result, advertisers pay higher CPM rates for rewarded ads.
Many gaming apps already use rewarded ads successfully.
Now publishers can also use them on WordPress websites.
In this guide, you will learn how to enable rewarded ads on a WordPress site.
You will also learn how to integrate rewarded ads using the AdX Ad Inserter plugin.
This step-by-step guide explains everything clearly.
Even beginners can implement it easily.
What Are Rewarded Ads?
Rewarded ads are opt-in advertisements.
Users watch the ad voluntarily to unlock a benefit.
Unlike intrusive ads, rewarded ads give users control.
For example:
- Unlock a download link
- Access premium article content
- Watch exclusive video content
- Remove a paywall temporarily
- Get access to hidden tools
Users willingly watch the ad.
Therefore the completion rate becomes extremely high.
Advertisers love rewarded ads because engagement is real.
Publishers benefit because CPM rates increase.
This model creates a win-win situation.
Users receive value.
Publishers earn revenue.
Advertisers get real engagement.
Why Rewarded Ads Are Powerful for Publishers
Rewarded ads provide several advantages over traditional display ads.
Let’s understand the biggest benefits.
1. Higher Ad Revenue
Rewarded ads deliver very high engagement.
Users voluntarily watch the ad.
Therefore completion rates often exceed 80% to 90%.
Advertisers pay more for such engagement.
Because of this, rewarded ads often generate higher CPM rates.
2. Better User Experience
Traditional ads sometimes interrupt users.
Popups and autoplay ads may irritate visitors.
Rewarded ads work differently.
Users choose to watch the ad.
Therefore the experience feels fair and respectful.
Users feel in control.
3. Increased Website Engagement
Rewarded ads encourage interaction.
Users actively click a button to watch the ad.
This interaction increases engagement signals.
Higher engagement can improve:
- session duration
- user retention
- page interactions
These signals often improve overall site performance.
4. Ideal for Premium Content
Many publishers hide content behind paywalls.
However strict paywalls reduce traffic.
Rewarded ads provide a smart alternative.
Users can unlock content without paying money.
Instead they watch a short advertisement.
This model keeps content accessible while generating revenue.
Types of Content You Can Unlock Using Rewarded Ads
Rewarded ads work best when users receive clear value.
Here are some common implementations.
Download Links
Many websites provide downloadable files.
Examples include:
- software tools
- templates
- ebooks
- educational materials
Users can watch a rewarded ad to unlock the download.
Premium Articles
Some websites publish detailed guides.
Instead of a full paywall, users can watch an ad.
After watching, they can access the complete article.
Video Content
Educational platforms often use rewarded ads.
Users watch a short ad to unlock a premium video.
Tools and Calculators
Many sites offer useful tools.
Examples include:
- SEO tools
- calculators
- converters
- templates
Users watch an ad before using the tool.
Requirements Before Enabling Rewarded Ads
Before implementing rewarded ads, ensure these requirements.
1. Google Ad Manager Account
Rewarded ads work through Google Ad Manager (GAM).
You must have a GAM account connected to AdX demand.
2. Rewarded Ad Slot
Inside Google Ad Manager, create a Rewarded Ad unit.
This unit will generate the ad code.
3. WordPress Website
Your website must run on WordPress.
This guide focuses specifically on WordPress implementation.
4. Ad Placement Tool
You need a plugin or script to place ads easily.
Here the best solution is AdX Ad Inserter plugin.
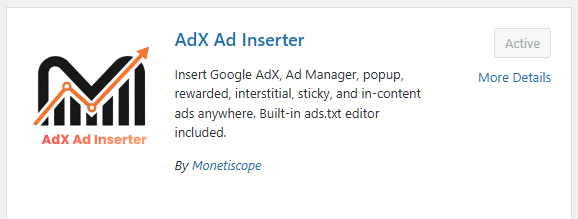
What Is AdX Ad Inserter Plugin?
AdX Ad Inserter is a lightweight WordPress plugin.
It helps publishers place Google Ad Manager ads easily.
Instead of inserting complex scripts, publishers only add Ad Slot lines.
Example format:
123456/site_300x250
The plugin automatically loads the required ad code.
This approach removes coding complexity.
Why Use AdX Ad Inserter for Rewarded Ads
The plugin simplifies ad integration dramatically.
Here are its main advantages.
No Coding Required
You do not need to insert long GPT scripts.
Simply paste your ad slot line.
Clean and Lightweight
The plugin avoids unnecessary scripts.
Therefore website speed remains stable.
Multiple Ad Formats Supported
The plugin supports many formats including:
- Display ads
- In-article ads
- Anchor ads
- Interstitial ads
- Rewarded ads
- Offerwall ads
Header and Footer Script Editor
The plugin also allows custom scripts.
You can place code inside:
- <head>
- </body>
Easy Setup
Setup requires only a few minutes.
Even beginners can configure it quickly.
Step-by-Step Guide to Enable Rewarded Ads on WordPress
Now let’s walk through the complete process.
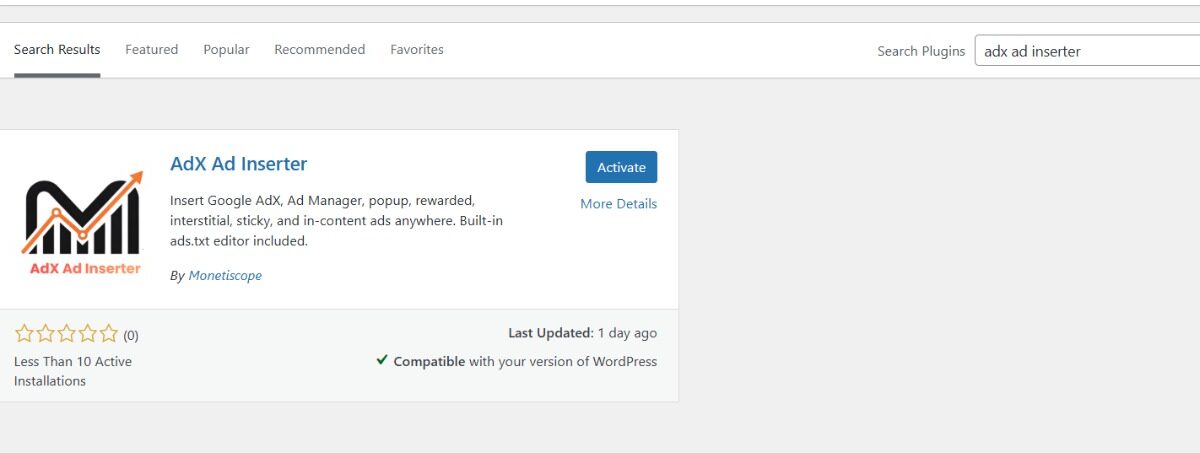
Step 1: Install AdX Ad Inserter Plugin
First install the plugin.
Follow these steps.
- Login to WordPress dashboard
- Go to Plugins → Add New
- Search for AdX Ad Inserter
- Activate the plugin
- Click Install Now
Once activated, open the plugin settings.
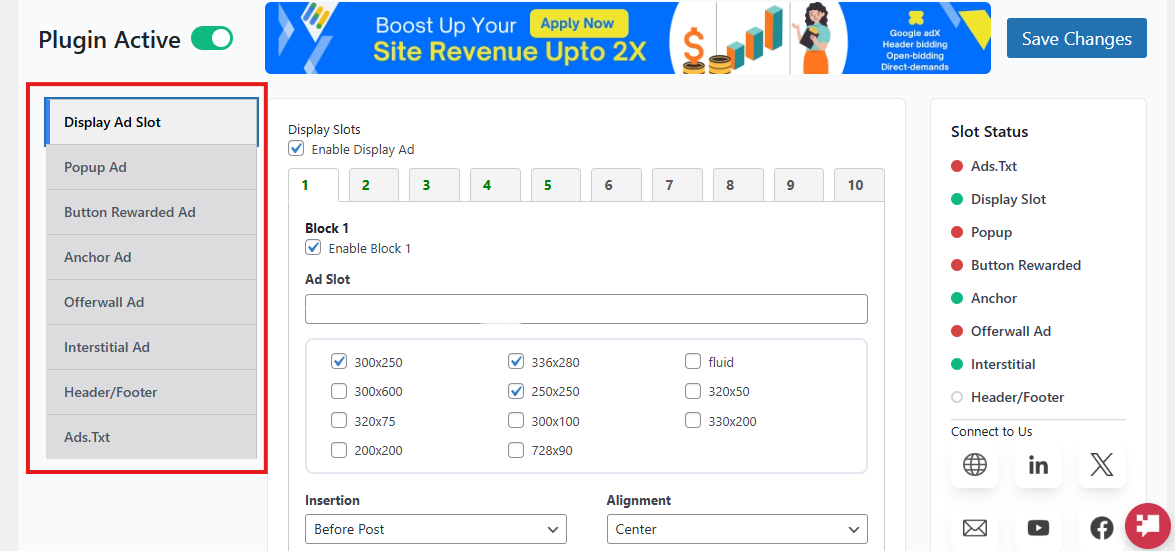
Step 2: Enable the Plugin
Inside settings, you will see the Global Enable Switch.
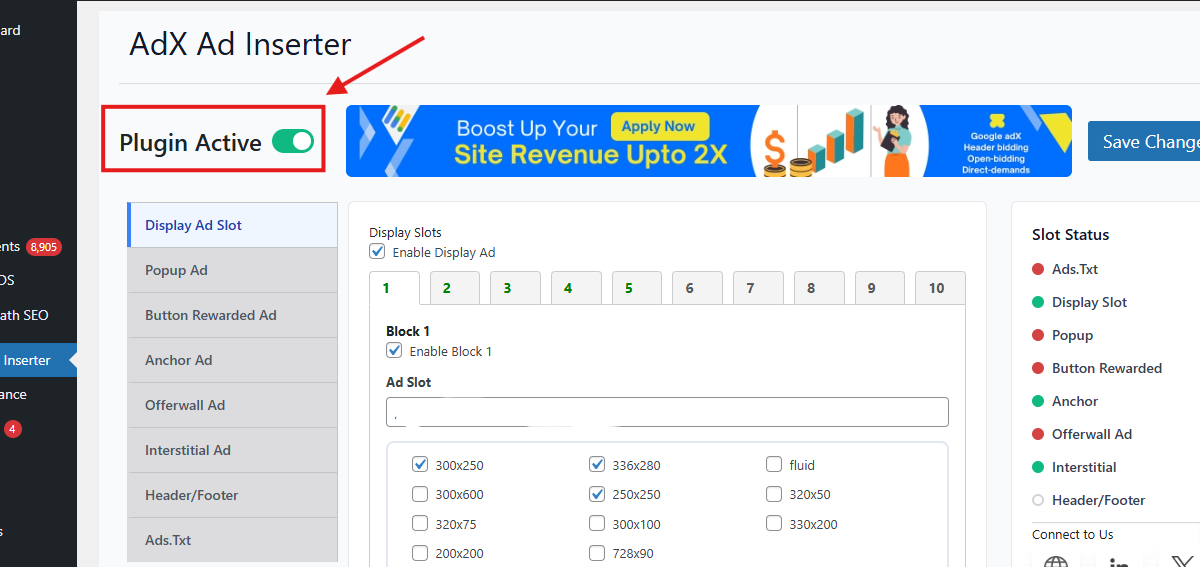
Turn it ON.
This activates all ad modules.
Without enabling this option, ads will not display.
Step 3: Create Rewarded Ad Unit in Google Ad Manager
Next create the rewarded ad unit.
Open Google Ad Manager dashboard.
Follow these steps.
- Go to Inventory → Ad Units
- Click Create Ad Unit
- Select Rewarded Ad Format
- Enter ad unit name
- Save the ad unit
After saving, copy the Ad Slot Path.
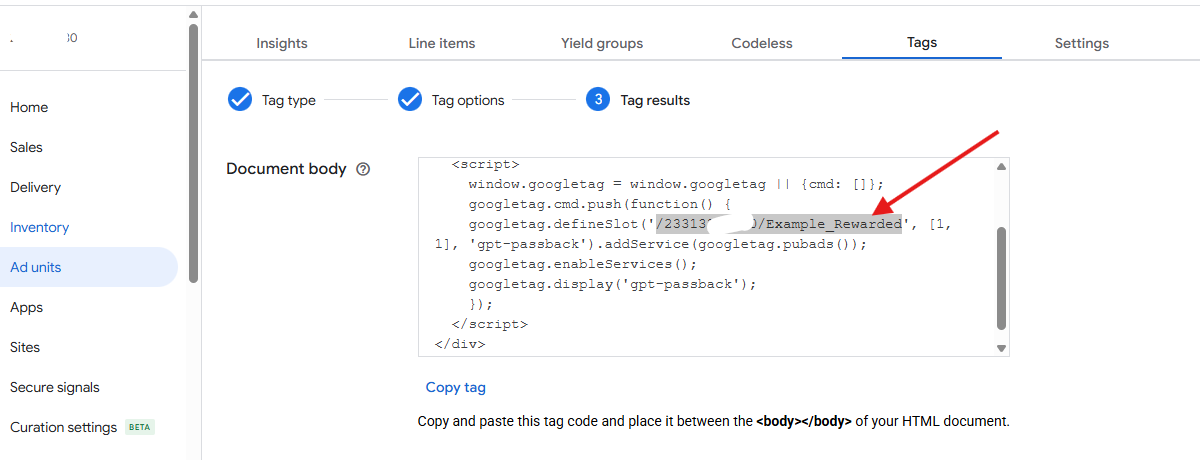
Example:
123456/rewarded_ad_unit
Step 4: Open Rewarded Ad Settings in Plugin
Now return to WordPress.
Open AdX Ad Inserter settings.
Locate the Rewarded Ad slot.
You will see a field to paste the ad slot.
Paste the slot line.
Example:
123456/rewarded_ad_unit
Save settings.
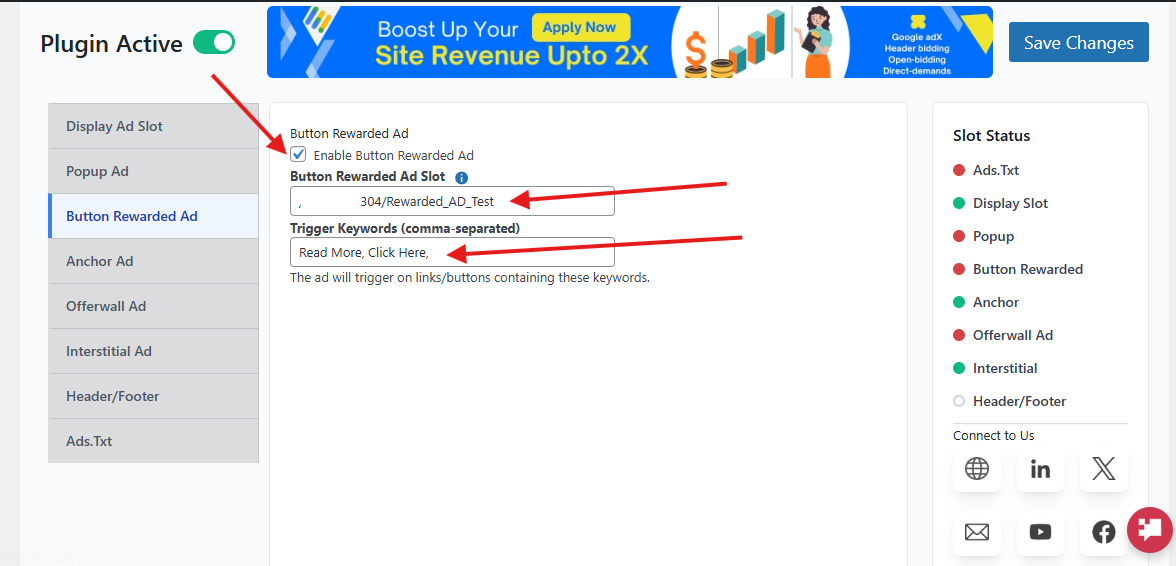
Step 5: Configure Trigger Keywords
Rewarded ads often trigger on user actions.
For example:
- Download
- Click
- Unlock
- Continue
Inside the plugin settings, you can add trigger keywords.
The plugin detects these words automatically.
When users click elements containing those keywords, the rewarded ad appears.
Example keywords:
Download
Unlock
Continue
Watch
This system allows flexible implementation.
Step 6: Place Trigger Button on Website
Now create a button on your page.
Example HTML button:
<button>Download File</button>
When users click the button, the rewarded ad appears.
After watching the ad, the download unlocks.
This method keeps the experience smooth.
Step 7: Test the Rewarded Ad
Testing is very important.
Open your website.
Click the trigger button.
Ensure the rewarded ad loads correctly.
Check the following:
- ad loads smoothly
- ad completion works
- reward unlock triggers correctly
If everything works, the setup is complete.
Best Practices for Rewarded Ads
Rewarded ads work best with proper strategy.
Here are some practical tips.
Provide Clear Value
Users must understand the reward.
Always explain the benefit clearly.
Example:
“Watch this short ad to unlock the download.”
Clarity increases ad completion.
Do Not Overuse Rewarded Ads
Too many rewarded ads may annoy users.
Use them only for valuable actions.
Examples include:
- downloads
- premium guides
- tools
Balance is important.
Place Ads After Engagement
Rewarded ads work better after engagement.
Allow users to explore content first.
Then offer the rewarded ad.
This approach increases acceptance.
Keep Ad Experience Smooth
Slow ads destroy user experience.
Therefore ensure:
- scripts load quickly
- website speed remains optimized
Use lightweight plugins only.
Common Mistakes Publishers Should Avoid
Many publishers make avoidable mistakes.
Let’s discuss the common ones.
Forcing Rewarded Ads
Rewarded ads should remain optional.
Never force users to watch them.
Otherwise the experience becomes negative.
Hiding the Reward
Users must know what they receive.
Always mention the reward clearly.
Transparency builds trust.
Placing Too Many Ads
Rewarded ads should remain valuable.
Overusing them reduces engagement.
Poor Page Speed
Heavy scripts slow down websites.
Use optimized tools only.
How Rewarded Ads Increase Revenue
Rewarded ads improve revenue through multiple mechanisms.
Higher Completion Rates
Users voluntarily watch the ad.
Completion rates remain extremely high.
Premium Advertiser Demand
Advertisers prefer engaged audiences.
Rewarded ads provide strong engagement signals.
Therefore demand increases.
Better Viewability
Rewarded ads appear only when users trigger them.
Thus the ad remains fully visible.
High viewability improves CPM rates.
Future of Rewarded Ads on Websites
Rewarded ads will grow significantly.
Publishers want better monetization without hurting user experience.
Rewarded ads offer exactly that.
Many industries will adopt them including:
- education websites
- tool platforms
- content publishers
- download websites
The model benefits everyone.
Users receive value.
Publishers earn revenue.
Advertisers reach engaged audiences.
Conclusion
Rewarded ads represent one of the most effective modern monetization strategies.
They combine user choice, engagement, and high revenue potential.
Unlike intrusive ads, rewarded ads respect user decisions.
Users voluntarily watch ads in exchange for real value.
Therefore engagement becomes extremely strong.
WordPress publishers can implement rewarded ads easily.
Using the AdX Ad Inserter plugin, integration becomes simple.
No coding knowledge is required.
You only need to paste your Google Ad Manager ad slot line.
Then configure trigger keywords and reward actions.
Within minutes your rewarded ads become active.
If implemented correctly, rewarded ads can significantly increase revenue.
At the same time, they improve user satisfaction.
This combination makes rewarded ads one of the best monetization tools for modern publishers.