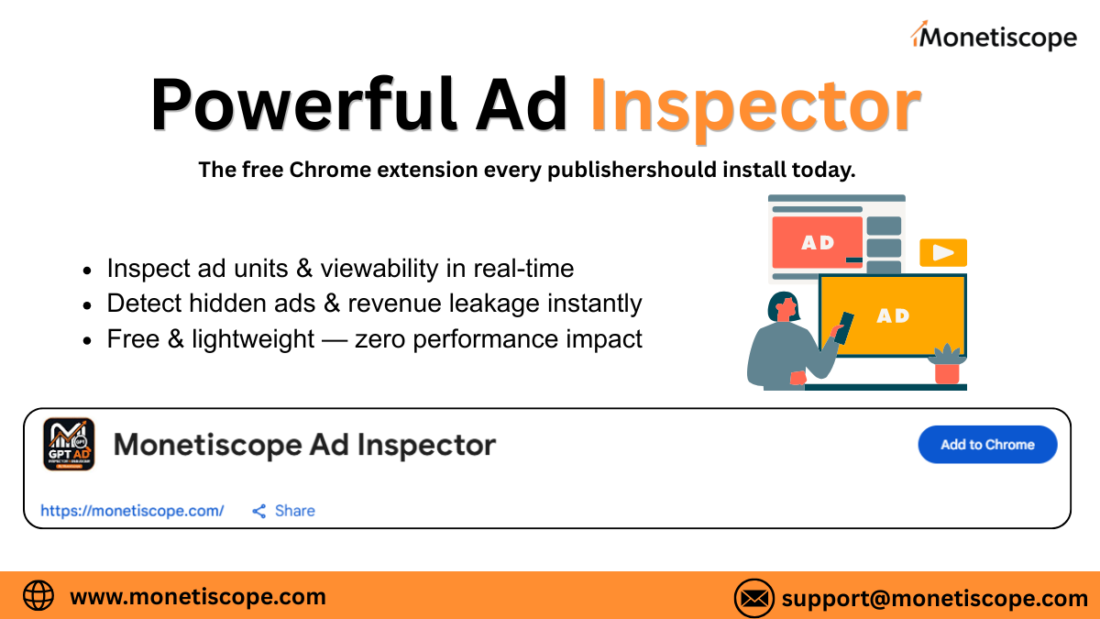
Monetiscope Ad Inspector Could Be the Most Useful Free Tool Publishers Are Missing
Monetiscope Ad Inspector is changing how publishers, ad operations teams, and developers inspect and optimize their advertising setups.
Let’s be real.
Most publishers spend hours trying to figure out why a specific ad isn’t loading.
Sometimes revenue drops suddenly.
Sometimes fill rates look strange.
Sometimes GPT tags seem perfectly fine but ads still don’t render correctly.
And honestly, debugging those issues can become frustrating very quickly.
Many publishers open browser developer tools, inspect page source code, check console logs, compare network requests, and still struggle to identify the real issue.
That’s exactly where a specialized diagnostic tool becomes valuable.
Monetiscope Ad Inspector was built to simplify this entire process.
Instead of manually hunting through hundreds of lines of code, publishers can instantly visualize ad slots, inspect live Google Ad Manager configurations, monitor GPT events, analyze responsive mappings, and identify potential policy risks.
The best part?
It’s completely free.
No registration.
No email collection.
No hidden upsells.
No complicated setup process.
Just install it and start auditing your ad implementation instantly.
For publishers running Google Ad Manager, AdSense, Ad Exchange, Open Bidding, or Header Bidding setups, this extension can quickly become part of your daily workflow.
Why Modern Publishers Need Better Ad Diagnostics
The advertising ecosystem has become significantly more complicated.
A few years ago, most websites only managed a handful of ad units.
Today things look very different.
Many websites run:
- Google Ad Manager
- Google Ad Exchange
- AdSense
- Open Bidding
- Header Bidding
- Responsive Ads
- Sticky Units
- Anchor Ads
- Interstitial Ads
- Video Ads
Now imagine troubleshooting all those systems manually.
Yikes.
A small configuration mistake can impact:
- Revenue
- Viewability
- Fill Rate
- User Experience
- CPM
- Policy Compliance
And unfortunately many publishers discover problems only after revenue starts falling.
That’s usually too late.
A proactive monitoring approach works much better.
What Exactly Is Monetiscope Ad Inspector?
Monetiscope Ad Inspector is a lightweight Chrome extension designed specifically for publishers and ad operations professionals.
It helps users inspect, debug, analyze, and optimize advertising implementations directly on live webpages.
Unlike traditional browser debugging tools, it focuses entirely on ad technology.
The extension works seamlessly with:
| Supported Technology | Supported |
|---|---|
| Google Publisher Tag (GPT) | Yes |
| Google Ad Manager (GAM) | Yes |
| Google Ad Exchange (AdX) | Yes |
| Google AdSense | Yes |
| Header Bidding | Yes |
| Responsive Ads | Yes |
| Sticky Ads | Yes |
| Floating Ads | Yes |
| Interstitial Ads | Yes |
| Native Ads | Yes |
This makes it useful for both beginner publishers and experienced Ad Ops teams.
No Login. No Sign-Up. No Barriers.
One feature that deserves special attention is accessibility.
Many tools create friction before users even experience the product.
You install the extension.
Then you’re asked for:
- Registration
- Verification
- Payment details
- Subscription
Honestly, that’s annoying.
Monetiscope Ad Inspector removes all of that.
Install it.
Open it.
Start analyzing.
That’s it.
This frictionless approach makes adoption extremely easy for publishers.
Lightning Fast Performance
Nobody wants a diagnostic extension that slows down webpages.
The extension was designed with performance in mind.
Because it avoids heavy frameworks and unnecessary dependencies, it loads almost instantly.
This provides several advantages:
- Faster inspections
- Lower memory usage
- Minimal browser impact
- Better user experience
Publishers can run audits without worrying about browser slowdowns.
Detect GPT Configurations Instantly
One of the most useful features involves GPT detection.
Google Publisher Tag forms the foundation of many monetization setups.
However, many publishers don’t always know whether everything is configured properly.
The extension immediately identifies:
- GPT presence
- Single Request Architecture status
- Lazy Loading setup
- Collapse Empty Div configuration
Instead of digging through source code manually, publishers get immediate visibility.
This alone can save considerable troubleshooting time.
Visual Ad Slot Highlighting Makes Debugging Easier
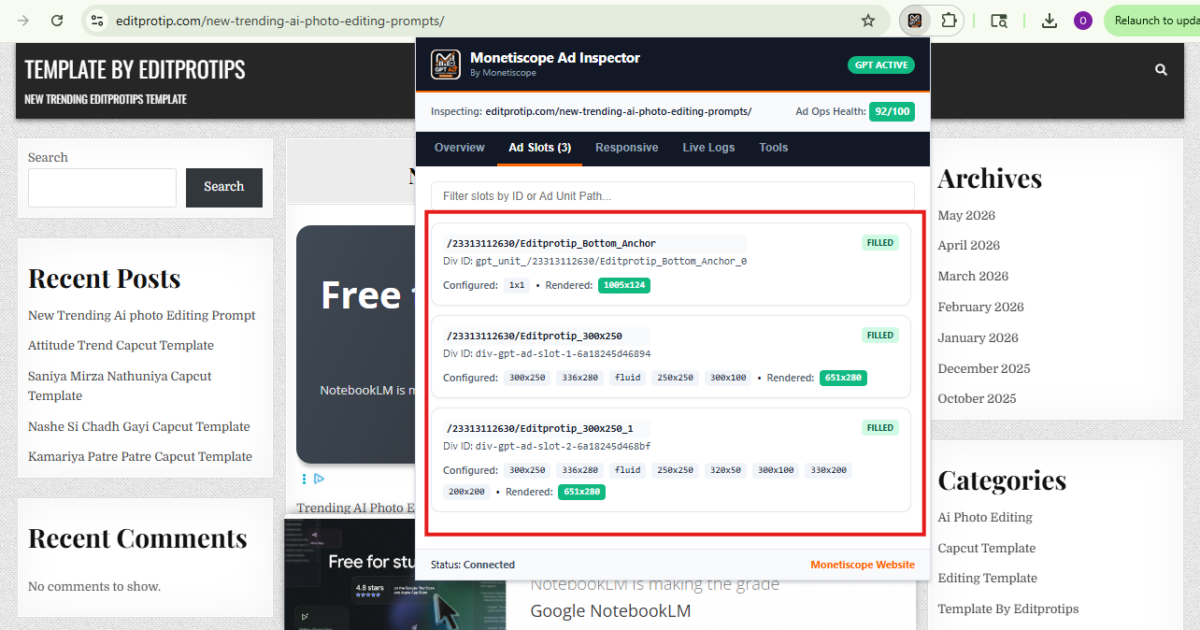
Visual debugging is where the extension becomes really impressive.
The tool highlights ad containers directly on the webpage.
Different colors provide immediate context:
Green:
Filled ad slots
Red:
Empty ad slots
Blue:
Sticky and anchor units
This visual representation helps publishers understand inventory behavior instantly.
No guessing.
No confusion.
Just clear visual diagnostics.
Interactive Diagnostic Cards Add Serious Value
Each highlighted ad unit displays a floating information card.
These cards provide detailed insights including:
- Ad Unit Path
- Creative Information
- Line Item Information
- Supply Source
- Filled Size Metrics
- Div IDs
Developers and Ad Ops professionals can copy paths directly.
Even better, Creative IDs and Line Item IDs can link directly into Google Ad Manager workflows.
That significantly speeds up investigation processes.
Responsive Size Mapping Inspector
Responsive advertising is critical today.
Users browse websites using:
- Phones
- Tablets
- Laptops
- Desktop Monitors
Each screen size requires different ad behavior.
Unfortunately, responsive size mappings often become difficult to audit.
The extension simplifies that process.
Publishers can inspect:
- Viewport breakpoints
- Allowed sizes
- Responsive mappings
- Device-specific behavior
This makes identifying configuration mistakes much easier.
Real-Time GPT Event Monitoring
This feature is especially useful for Ad Ops teams.
GPT events reveal what happens behind the scenes during ad delivery.
The extension provides live monitoring for:
- Requests
- Responses
- Render Events
- Refresh Events
- Viewability Events
All events include precise timestamps.
That means publishers can understand exactly when something happens.
This becomes extremely useful when investigating delivery issues.
Auto-Generated Ad Health Scores
Most publishers don’t know when they’re approaching policy risks.
That’s where automated diagnostics become valuable.
The extension evaluates several monetization factors.
These include:
High Ad Density
Too many ads above the fold can negatively affect user experience.
Google also monitors excessive ad density.
The extension identifies potential concerns automatically.
Sticky Ad Warnings
Sticky units can generate strong revenue.
However, excessive sticky usage creates compliance concerns.
The extension flags situations where multiple floating units may interfere with content.
Aggressive Refresh Monitoring
Google generally requires refresh intervals of at least 30 seconds.
Some publishers accidentally configure shorter refresh periods.
That creates unnecessary risk.
The extension automatically identifies potential violations.
This proactive monitoring can help prevent monetization issues before they become serious.
Copy and Export Audit Data
Debugging often involves collaboration.
Developers may need diagnostic information.
Ad Ops managers may require reports.
Monetiscope Ad Inspector allows users to:
- Copy debugging payloads
- Export JSON reports
- Share audit data quickly
This streamlines communication across teams.
Who Should Use This Extension?
Honestly, almost anyone involved in website monetization can benefit.
Publishers
Publishers can:
- Improve CPM
- Increase Fill Rate
- Identify implementation mistakes
- Reduce revenue leakage
Ad Operations Teams
Ad Ops professionals can:
- Troubleshoot line items
- Audit inventory
- Verify dynamic allocation
- Monitor delivery behavior
Developers
Developers gain visibility into:
- GPT integrations
- Responsive mappings
- Rendering issues
- Event timing
Media Companies
Media businesses managing large inventories can:
- Monitor compliance
- Improve ad quality
- Optimize layouts
- Protect user experience
Common Problems This Tool Helps Solve
Let’s look at real-world scenarios.
| Problem | Solution |
|---|---|
| Ad not rendering | Verify slot configuration |
| Revenue suddenly dropped | Check fill and delivery behavior |
| Responsive ad issues | Inspect size mappings |
| Empty ad containers | Identify serving problems |
| Refresh concerns | Monitor refresh timing |
| Policy risks | Review health warnings |
| Layout shifts | Audit ad positioning |
| Low viewability | Analyze slot behavior |
These issues happen more often than many publishers realize.
Myth vs Truth
Myth:
Only large publishers need ad debugging tools.
Truth:
Even small websites can lose revenue from implementation mistakes.
Myth:
Google Ad Manager always works perfectly.
Truth:
Configuration errors happen frequently.
Myth:
Browser developer tools provide everything.
Truth:
Ad-specific diagnostics are much faster and easier.
Myth:
Ad policy violations are always obvious.
Truth:
Many compliance issues remain hidden until warnings arrive.
Myth:
Monitoring GPT events isn’t important.
Truth:
Event monitoring often reveals the root cause of delivery problems.
How Monetiscope Helps Publishers Beyond This Extension
The extension is only one part of the Monetiscope ecosystem.
Monetiscope works closely with publishers to improve monetization performance.
The team assists with:
- Google Ad Exchange onboarding
- Revenue optimization
- Viewability improvements
- Ad placement strategies
- Policy compliance
- Ad implementation reviews
- Header Bidding consultation
- Publisher growth support
Many publishers focus only on traffic.
However, monetization quality matters equally.
Even small implementation improvements can significantly impact earnings.
That’s where expert guidance often makes a difference.
Why Privacy Matters
Privacy concerns continue growing across the internet.
Many browser extensions collect excessive user data.
Monetiscope Ad Inspector takes a different approach.
The extension:
- Does not collect browsing history
- Does not inject external ads
- Does not harvest personal information
- Performs diagnostics locally
This privacy-first approach builds trust among publishers and developers.
The Future of Publisher Diagnostics
Programmatic advertising continues evolving.
New formats appear regularly.
New monetization strategies emerge every year.
Meanwhile, policy requirements become stricter.
Publishers need tools that simplify complexity.
Diagnostic platforms will likely become standard workflow components.
The ability to identify problems quickly can directly influence revenue outcomes.
And honestly, that’s becoming increasingly important.
Final Thoughts
The advertising ecosystem isn’t getting simpler.
If anything, it’s becoming more technical every year.
Publishers must balance:
- Revenue
- Compliance
- User Experience
- Performance
That’s not easy.
Monetiscope Ad Inspector helps bridge that gap.
It provides publishers, developers, and Ad Ops teams with practical visibility into their ad stack.
The extension is free.
It’s lightweight.
It’s easy to use.
And it solves real-world problems.
For anyone managing Google Ad Manager, Ad Exchange, AdSense, or GPT implementations, this tool is definitely worth installing.
No complicated setup.
No learning curve.
Just useful diagnostics that help protect and optimize monetization performance.
Add it to Chrome today and take control of your ad stack with confidence.

Frequently Asked Questions
Is Monetiscope Ad Inspector completely free?
Yes. The extension is completely free and does not require any subscription, registration, or account creation.
Does the extension work with Google Ad Manager?
Absolutely. It was specifically designed to inspect and debug Google Ad Manager implementations.
Can I use it on websites running AdSense?
Yes. The extension supports Google AdSense along with Google Ad Exchange environments.
Will the extension slow down my browser?
Not really. It was built with a lightweight architecture and maintains a very small memory footprint.
Can developers use this extension for debugging?
Definitely. Developers can inspect GPT behavior, responsive mappings, rendering events, and container configurations.
Does it support responsive advertising audits?
Yes. The Responsive Size Mapping Inspector helps analyze viewport breakpoints and supported creative sizes.
Is my browsing data collected?
No. The extension performs diagnostics locally and does not collect browsing history or personal information.
Can it identify policy risks?
It can identify several potential concerns including excessive ad density, aggressive refresh behavior, and sticky ad issues.
Who benefits most from this extension?
Publishers, Ad Ops teams, developers, agencies, media companies, and anyone managing programmatic advertising setups.
How can Monetiscope help beyond the extension?
Monetiscope provides monetization consulting, Google Ad Exchange onboarding, revenue optimization, policy guidance, viewability improvements, and advanced publisher support services.